Tuesday, November 17, 2015

What's Next, Part I

Snow on the ground and nights in the 30s means winter is coming or in some locales, has arrived. Rejoice or lament, there are plenty of things to do inside to get your green fix (not that kind of green fix).  I'm talking about easy and mostly low-cost foliage futzing about, just take your pick - plant amaryllis or paperwhite bulbs, or force spring bulbs now for late winter enjoyment. How about planting some unique glass terrariums or decorating with the easiest of care air plants, aka - tillandsias or beyond gorgeous orchids?  For your homegrown fix consider growing micro-greens, sprouts or planting garlic in a pretty container to use as chives.  And if you're creative and love DIY projects for the holidays or anytime, I've linked some websites that will expand your selection and possibly require a second glue gun (aren't they just about the best invention ever)?  This is Part I, check back soon for Part II.

Holiday Bulbs: 


Start amaryllis bulbs indoors in November for late December/early January bloom and stagger planting into the New Year.  Have fun choosing colors and sizes.  They range in shades of red, salmon, pink, green, yellow, white or dramatic bicolored or striped colors. You get what you pay for, smaller bulbs found in discount or box stores may not have the robust flowering that says "wow!"   

Use new potting soil in 6-inch pots (or a container that is just an inch larger than the bulb) with a third of the bulb showing above the pot rim. Water well and place in a cool area. Hold off on watering until growth appears, then water more frequently and move to a sunny location.  Quality bulbs should produce two flower stalks with four flowers on each stem.  For more information click here - amaryllis


Paperwhite narcissus bulbs are quick and super easy to grow in either water or soil. Garden centers stock paperwhites all through the winter season so plant them now and often. For family fun ask your kids or grandkids to help. Use a glass container filled with a 2-inch or more layer of pebbles or decorative rock, place the bulbs on top and fill in around them with more pebbles to keep them in place. Add water until it touches the bottom of the bulbs and maintain that level. If planting in fresh potting soil, sink the bulbs slightly in a soil filled container.  Use a container with drainage holes, if not then start with a 1/2 inch layer of small rock pebbles below the potting soil.


Paperwhites just about to bloom


Place the container in a bright room, not too warm (70 is just fine). They start blooming as early as three weeks.  Use decorative or seasonal twigs, or stakes to support the stems.  If you want to keep the stems shorter, try mixing in a very small amount of vodka, gin or rubbing alcohol in the water filled container (don't use with soil planted bulbs).  More - Pickling your Paperwhites.

After they are finished blooming (flowers turn brownish and you'll know they are gone), toss in the compost pile. Clean the container and start another set! 

  
I found this giant glass vase on the sale rack at a furniture store.  It's become my favorite way to grow and seasonally display paperwhites.  I use artificial berry branches after Thanksgiving through the holidays.  If using fresh branches of any kind, you'll have to set them in their own tiny vase within the vase because live branches will break down in the water causing discoloration (of the water).  

Some of my favorite DIY garden links (some sites require registration): 

Hometalk 

Gardening on Pinterest 

Apartment Therapy Fall Wreaths 

DIY Centerpieces 


Monday, November 9, 2015

Green Manure Magic

Last blog I covered covering open planting beds with shredded leaves to protect the soil, sort of like building a cozy winter's cape.  That's a lot of c's in one sentence.  So allow me to switch gears but continue the conversation about your garden soil and other considerations for winter care.
 
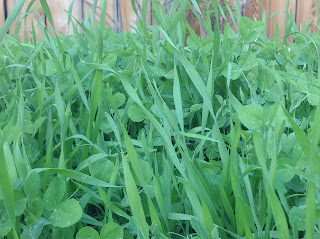
Close Up Cover Crop - Austrian Peas/Winter Rye

Another "covering" option for bare soil is to plant a green manure, also known as a cover crop.  From early Romans to the first American settlers, farmers have been using green manures to replenish, improve and prevent soil erosion.  Fields, or in our yards - planting beds that grow crops in the same location year after year need a break or an alternate crop that will enhance the soil by replacing lost nutrients. Planting green manures also improves soil quality (tilth), the soil's water holding abilities and provides a nice environment for beneficial earthworms and soil microorganisms to thrive.

Green manures can be direct seeded in the fall, spring or summer, just be sure to give the cover crop enough time to decompose before planting the next season of vegetables or annuals. Allow at least six weeks or longer to completely break down. If planted in the fall the hardy crops like winter rye and field peas will grow through the winter. Buckwheat and clover winter kill.  

Be careful not to let the crop go to seed, this is more of a consideration with spring or summer planted green manures. 

Rake area, spread seeds, cover seeds with soil and water
The planting procedure is simple - use several seeds, enough to fully cover the bare surface to prevent soil from blowing away.  In addition, this blanket of green will keep weeds out through the winter and when turned over in late winter and allowed to break down, the soil will be super charged with organic nutrients.  Use legume-type seeds for a beneficial nitrogen fix. Check the handy guide below for seed options based on the planting season.  Chart from the University of Wisconsin Horticulture, compiled from Johnny's Selected Seed Company and Cornell University Department of Horticulture.   

Check with your local garden center for seed availability or mail order.  


This bed was planted in October with winter rye and field peas. It's okay to mix seeds.


This bed was turned over in late winter and allowed several weeks to break down before planting.


Cover Crop
Sowing
Time
Seeding Rate Per 100 sq. ft.
(10’ x 10’ Garden)
Does This Plant Fix Nitrogen?
Growth Rate
Primary 
Uses/
Comments
Buckwheat
Spring,
Summer
2 lb
No
Fast
Is easily worked into the soil.
Attracts pollinators and beneficial insects.
Re-seeds prolifically. 
DO NOT allow to go to seed.
Clover
(Sweet)
Spring,
Summer
½ lb
Yes
Medium
Grows better in high pH soils than other clovers.
Oats
Late Summer, Early Fall
4 lb
No
Medium
Likes well drained soils.
Dies over the winter.
Makes a good choice in areas to be worked early the following spring.
Peas
(Field)
Spring,
Early Fall
5 lb
Yes
Fast
Can outcompete many weeds.
Radish
(Oilseed)
Fall
1 lb
No
Fast
Is easily worked into the soil.
Rye
(Winter)
Fall
4 lb
No
Fast
Easy to grow.
Grows fast.
Can be planted late in the season.
Ryegrass
(Annual)
Late Summer, Early Fall
1 lb
No
Fast
Easy to grow.
Wheat
(Winter)
Late Summer,  Fall
2 lb
No
Fast
Needs fertile soil.
Does not like low pH soils.

                                                                Chart from Wisconsin Horticulture


Summer planted buckwheat, beautiful plant and attracts beneficial insects!


Sunday, November 1, 2015

Bed Time

It's November so the window for getting all the fall landscape chores is closing. Notice the word "all." Thank goodness there are no landscape police who will be issuing warnings if things aren't one hundred percent completed by the time it's just too darn cold to be outside.  Finish your list as weather and time permits, but one task is always done in my garden before the snow flies, or rather–before the snow remains put.
 
Any open or unplanted soil like a vegetable or annual planting area can be "put to bed." Just as tucking in young children before bedtime requires steps that generally include a bath, pj's, teeth brushing and hearing a great bedtime story, ( may I suggest Go, Dog. Go!), tucking in a garden area requires a few easy steps as well.
Use mowed leaves with grass for your bedding

The goal and outcome is to protect the soil through the winter. Tucking in or covering bare soil with a thick blanket of organic mulch each fall will almost guarantee easier planting and healthier soil next spring. If soil is left exposed all winter it cycles between wet - dry - cold - warm - windy periods which causes the soil to blow around, and crack and split like a dried out jar of brown shoe polish. Don't let this happen to you...or your precious garden soil! 

Dry, cracked, unhappy, not tucked in soil
The steps are simple, first pull out all remaining spent vegetables and annual plantings. Toss any disease-free materials into the compost pile. Next, the free "bedding" is all around you–fallen leaves with or without mowed grass (chemical-free a must). This mix makes the best comforter or maybe you're a duvet person. I like lots of blankets, so make your mulch bed three to four inches thick to begin. 

Place the shredded leaves over the bed, then water it well so it doesn't blow away in the first ten minutes. Renew the mulch all winter with leftover leaves you'll keep bagged outside somewhere (plan ahead and ask neighbors for their leaves for reserve). Weed and seed free straw is an option too.  

Avoid using wood mulch, especially for vegetable beds; it just doesn't break down easily like leaves and grass. Use wood mulch around perennials, shrubs and trees. In lieu of covering beds with organic material, growing cover crops adds valuable organic matter and protects the soil from blowing away.


Soil underneath will be protected all winter and much easier to work in next spring


"Go on...time to get out there and make your winter beds!"