Friday, December 23, 2016

Tuesday, December 20, 2016

There's Still Time!

If you're in the last minute or don't know what perfect gift to give the gardener in your life camp, fret no more. May I suggest the gift of education. 
Denver and the Front Range is very fortunate in having many free or low cost outlets for garden classes and seminars. Below is a list with links that I've put together for ones that I know of as of right now - I'll refresh the list (and re-post) the first of the New Year. Don't forget botanic garden memberships or plant societies, consider giving them a year's membership to meet other gardeners. Obviously if you don't reside in this area, check out what's offered in your neck of the woods.  

SEMINARS, CONFERENCES, WORKSHOPS:   

Jefferson County Beginning Vegetable Gardening Symposium - January 28, 2017

Landscaping with Colorado Native Plants Conference February 11, 2017

High Plains Landscape Workshop March 4, 2017 

Denver Rose Society Educational SymROSEium April 1, 2017

PUBLIC GARDEN INSTITUTIONS AND BOTANIC GARDENS:
 
Butterfly Pavilion Westminster

Denver Botanic Gardens
 
The Gardens on Spring Creek  Ft. Collins

The Hudson Gardens  Littleton

Pikes Peak Urban Gardens Colorado Springs

AREA GARDEN CENTERS:  too numerous to mention, so call around or check their websites or Facebook for their 2017 classes.

GARDEN SOCIETIES AND GARDEN RELATED GROUPS:

Colorado Cactus and Succulent Society
Colorado Native Plant Society
Colorado Water Garden Society
Denver Field Ornithologists
Denver Orchid Society
Denver Rose Society
Front Range Organic Gardeners
Ikebana Denver Chapter
Rocky Mountain African Violet Council
Rocky Mountain Chapter of the North American Rock Garden Society 
Rocky Mountain Koi Club
Rocky Mountain Unit of The Herb Society of America

Sunday, December 11, 2016

Farewell Gardening Season 2016

This year is one for the books, not just for gardening but for world and national events. Since this is a gardening blog I won't attempt to write about the intense election year that just took place. I just hope you agree with me that being out the garden is the place to get away from it all.

Last year my end of the year garden blog dealt with two areas - weather and insects. In 2015 we had too much rain and too many Japanese beetles. In 2016 we had less of the former and more of the latter. Let's visit some of the vegetable tales first, then a few comments about the landscape. I'm Japanese beetled out (for now), but you can read all about them starting here - Japanese beetles.

Without even looking up the exact rain totals for 2016, we were dry most of the summer and all through the fall. The living proof in my garden was the potato crop. In '14 and '15 they were more than content growing in the cool, moist temperatures, the yields were outstanding, the taste beyond any super market spud. This year I had to move them out of the baking hot raised bed garden area to the coolest part of the landscape with afternoon shade. I grew them in Smart Pots so moving them was the easy part, keeping them watered almost every day got tiresome and I could tell by looking at them that they just weren't liking the unrelenting heat. You'd think the tomatoes would be just the opposite and love the hot days, nope, not them either.

Some years tomatoes are more fussy than a three month old during the dinner hour. Instead of crying, a tomato will quickly show you what's bothering it. Temperatures over ninety degrees, especially for several days on end reduce flowers from forming and if they do flower, many of them simply dry up and drop off the vine. Fuss, fuss, and more fuss, I had lots of dropped tomato blossoms last summer. Denver was mostly in the nineties from June 9th into September, so their fuss quotient was over and beyond.
 
Throw in just one night of cool temperatures (less than fifty-five) and tomatoes sulk, often taking several days to resume proper growth, this happened more than once in mid-late August. On the 19th it went down to 51 for a couple of nights, then as low as 49 on August 25th. And no, I didn't pull out the cover cloths for protection (should have). It pretty much stayed in the mid-fifties at night from late August through September with a few warmer nights here and there. As days got shorter in to the fall, the harvest, which should have been robust was just so-so. Now this was my garden in central Denver and I realize there are always exceptions or gardeners who say they had a great tomato season. They are the ones right now enjoying their home canned stewed tomatoes or sauce. Not me, I'm back to store bought 😪.

Tomatoes appreciate fertilizer during their fruiting period, but too much will lead to more foliage growth and less fruiting, too little fertilizer is an invitation for early blight. This year I didn't have early blight, but I did have tomato spotted wilt virus which is very difficult to prevent, plus there's no cure once the plant is infected. Pulling and not composting the diseased plant is the only option.  

A thrip insect carries and spreads the fungal disease when they take up residence in your tomato's leaf tissue. These guys (thrips) can be found on many different weeds in the garden and move to tomatoes or other night shade vegetables. They can also hitch hike home from garden center plants. Read all about their life cycle from this CSU Fact Sheet. The plant symptoms of TSWV look much like other fungal or nutrient problems, including bronzed or spotted leaves, tip die back and a general lack of vigor, the fruits may become mottled or develop ring patterns. I lost four tomato plants to TWSV, I got a firm diagnosis from the Jefferson County Plant Diagnostic Clinic.

Tomato Spotted Wilt Virus
Next year I vow to purchase certified virus-free tomato seeds and grow my own plants or look for garden center varieties that are resistant to TSWV (not easy to find, your best bet is a reputable independent garden center, you may not find labeled virus-free vegetable plants in box stores). I also try to keep the garden area and near the alley fence weed free, but no doubt the weeds up and down the alley off our property may be harboring thrips. 

Basil veil over Smart Pot to keep Japanese beetles off!  It worked!

The basil crop was outstanding this year, no more downy mildew issues at all, the key was growing them in Smart Pots and not directly in the ground. I was able to seed three successive crops and used the leaves in salads, sandwiches and pesto with plenty left to chop, process with oil and freeze. 🙌 

I didn't plant squash this year after the garlic harvest, instead I planted a cover crop to improve the soil tilth and renew the fertility in two of the raised beds.

It was an average year for peppers and eggplant, I think the excessive heat and possible water issues (not enough) may have hurt them, but more than that I noticed that the roots really didn't reach out much in the soil. My hunch is that I just didn't score the compacted roots as well as they should have been cut. I checked out the root ball when I pulled the plants, sort of a visual root autopsy. The plants were small overall, another sign they just weren't growing well. My fault, my bad, thank goodness there's always next year!  

Final Swiss chard and lettuce harvest December 1, 2016
I skipped the early spring cool-season planting of the leafy crops and broccoli, but the August fall crop was a boom with several cut and grow again opportunities. In fact, the lettuce and Swiss chard finally pooped out or honestly, I threw in the trowel just a few weeks ago in early December. 😊

As for the ornamentals and rest of the landscape, despite a couple months of higher than average water use I have no complaints. I attribute the water use on establishing new plantings from the house build (especially the trees). In time that will even out and with the small turf area and water thrifty plantings, I look forward to much lower water bills. In earlier blogs I wrote about the new planting beds, I'll keep you posted on how they fill in over time.
 
Long Lasting Fall Colors and Textures
This past recent fall was visually delightful - the autumn colors were prominent and long lasting. It also seemed like the fruits and seedheads on shrubs, hawthorns, crab apples and many more plants held on for weeks, which only added to the orange, red and purple fall color parade. 


Winter has finally arrived in the Denver area (the mountains are getting tons of the white stuff, so come on out and ski). Snow has been spotty along the Front Range so far - we'll welcome any moisture to replenish our dry soils. Warm days in the 50s seem to sneak in here and there between the Canadian freeze events that have been seeping in to Colorado. Take advantage of the dry days above 40 degrees to water unfrozen new plantings and south facing areas of the landscape. After you drain the hoses, head inside for a warm cup of (your choice) and peruse the 2017 garden catalogs. Dog ear the pages or bookmark the company on your toolbar. Place your orders soon but save some dollars and support your local garden retailer. Better yet, stroll on in and get some seeds or other garden supplies. Breathe in the moist air and dream.....of you know what......spring. 😎

Fall Fruit was AWESOME in 2016

Friday, December 2, 2016

More Greenery Please

December is the month it truly sinks in that the landscape is mostly motionless shades of brown and grey. Your view outside may seem more lively if you have conifers to draw attention away from the dormant plants. Note to self - if outdoor greenery is in short supply plant more evergreens next spring. And throw in some ornamental grasses and shrubs that add not only texture, color and movement, but some contour and good hiding places for birds to hang out...keep a close eye on those cats!

Enduring winter isn't all bad, we know we have to have cold months to get to spring, plus we can get our green fix in other ways - you just need to look around for greenery in the form of freebies or low cost DIY tree cutting or shopping around. Release your creativity side even if you don't have the natural knack, I sure don't. Here's what I do...

Internet Photo from www.bjyapu.com
I look for free or low cost greenery at the Christmas tree lots that spring up immediately after Thanksgiving. They usually have a bin of excess branches that were cut to shape the tree. You will mostly find Frasier or Noble fir branches, but if you call around, you might find other types of conifers.

If you get a Colorado permit to cut your own Christmas tree in state and national forests, you get up to five permits per person ($10.00 each permit) so you'll have plenty of greens for use back at home. The permits are for trees, so use one of the permits for an extra tree that can be cut up into branches. Garden centers, grocery stores and box stores also carry bundled greens for use in all kinds of indoor and outdoor decorating - wreaths, boughs, swags and winter floral arrangements. 
Internet Photo from gtrinity.com

So you've got your greens, now what?  First of all, realistically they'll only last a few weeks after Christmas unless you're diligent about spritzing with water or using anti-desiccant commercial sprays. It's Colorado after all, home of mostly year round fifteen percent humidity. Better add to your list another tube of moisturizer.

Here are some greenery tips - 
  • For holiday cheer deck the table setting, front door, mantle and all through the house with fresh greenery (artificial works too, pine fragrance sold separately).
  • There are many evergreens to choose from, but the best scents come from Scotch pines, Balsam, Douglas and Frasier firs. Stay away from white spruce, their needles don't smell nice when crushed. The aroma from eastern red cedar can't be beat, but these Christmas trees generally aren't sold in our area.
  • Before you decorate with greenery first get them well hydrated - fill a bucket with room-temperature, non-softened water to hold the greens.
  • With a hand pruner make diagonal cuts through the stems, and then using a small hammer gently crush the exposed end, this will help with water uptake.
  • Set the stems back in the water for a few hours before making a wreath, swag or boughs to hang, then decorate. You'll need twine or wire to attach branches, plus bows, ornaments and any other holiday adornments.  
  • Supplement arrangements inside or out with juniper, eucalyptus, lavender sprays, rosemary cuttings, twigs and branches, dried fruits, dried flowers and pine cones. Use artificial materials or flowers to fill in if less fresh greenery is available. The possibilities are many, just check on Pinterest or Houzz for thousands of ideas. And don't forget the lights.
  • Using greenery and other seasonal props in outside containers is a festive way to celebrate the holidays and spark up dreary empty pots. I recommend removing spent annuals and some soil well before the soil freezes so it's easier to fill and decorate. If the outdoor containers are frozen solid, then just layer in the greenery or if there's room drop in a greenery pot that was assembled indoors.
  • Caution on clay or glazed outdoor containers. Eventually they may crack from the Colorado freeze thaw cycles, but if you are leaving them outside anyway and not covering them or elevating them from direct cold from the ground, then by all means give them a pop of winter decor. Plastic, concrete and metal containers should weather just fine.
Winter Outdoor Container Ideas -

Assorted Layered Greenery Urn


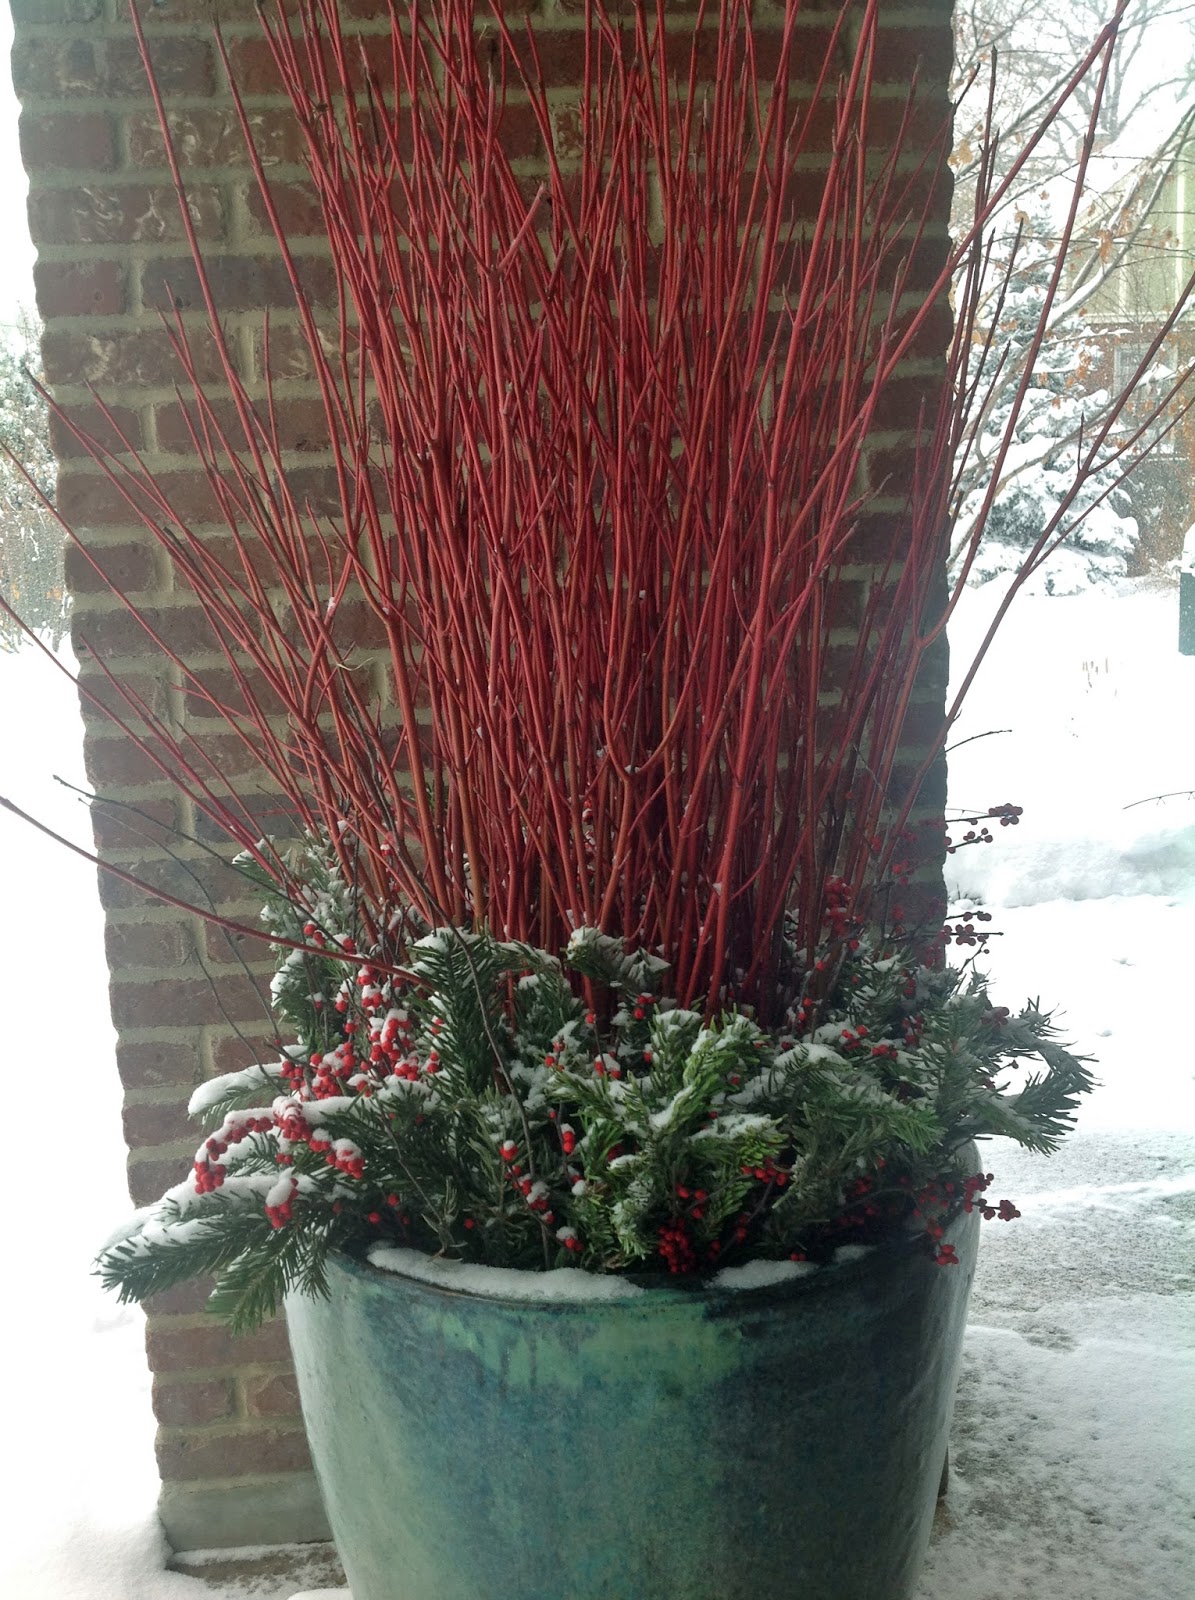
Curly Willow, Spruce Branches and Ilex

Cardinal Dogwood, Spruce and Ilex


Internet Photo from Pinterest
 
Simple Outdoor Design with Birch, Greens and Pine Cones from Pinterest

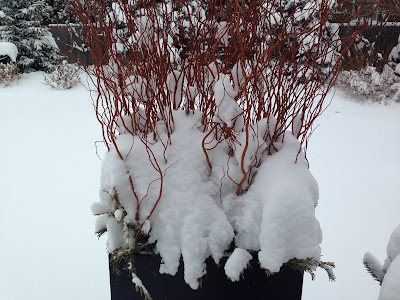
Snow on Curly Willow and Spruce Greenery


 Wishing you a joyous holiday season. I'll return for a few more blogs before year's end. 


Tuesday, November 22, 2016

Gift Giving...Make Mine a Rose Herbal Surprise

With apologies to Gertrude Stein, "a rose is a rose is an herb." Plants defined as herbs are useful for fragrance, food or flavoring. Many have properties effective as medicine or coloring materials - for a natural dye mix lavender, roses and a little mint and lemon juice to turn materials shades of pink. 

Roses more than qualify as top shelf herbs, their provenance dates back to the sixteenth century Ottoman Empire where rose petals were distilled and made into rose oil*. This holiday season consider the "Queen of Flowers" for gift giving in one or more of their herbal delightful forms - most can be made right in your own kitchen. 

Pamper

Rose and Lavender Bath Oil (from The Book of Herbs), Dawn Titmus)
Ingredients: one cup of almond oil, five drops of rose essential oil (use good quality when using on the skin), five drops of lavender essential oil, sprig or two of dried lavender, dried rose petals (small handful, don't use fresh petals), a decorative bottle to hold one cup or more, raffia
Directions: tie dried lavender sprigs (shorter than the bottle) with raffia and put in the bottle. Add dried rose petals. Pour half the almond oil into the bottle. Add the rose essential oil drop by drop, then the lavender essential oil. Top the bottle with the remaining almond oil, and then swirl the mixture so the fragrances blend well. 

Rose Petal Bath Salts from POPSUGAR
Rose Petal Bath Salts (from 
POPSUGAR Sarah Lipoff)  Makes two cups
Ingredients: rose essential oil, one cup dried rose petals, one cup Epsom salts, 1/3 cup baking soda, 2/3 cup powdered milk, glass sealable container.
Directions: crumble rose petals into small pieces on a plate, then drizzle with a few drops of rose essential oil. Mix together Epsom salts, baking soda and powdered milk in a bowl, breaking up any clumps. Layer the dried ingredients between the rose pieces in the container, starting with the dry ingredients. Layer to the top, the scent will be stronger the longer it mingles in the jar. Add a large scoop (~1/4 cup) to your next hot bath for instant stress relief!

Culinary

Refreshing Tea (Betty Cahill) 
Ingredients: 1/2 cup loose green or black tea, 2 tablespoons rose buds
2 tablespoons cut orange peel
Directions: mix all ingredients and store in an airtight container
Brew: put one teaspoon loose tea in an infuser or tea ball, pour boiling water in cup and steep for a few minutes. Sweeten to taste, sip and enjoy.

Photo from StudioBotanica

Rose Petal Vinegar (Barbara Milo Orbach)
Ingredients: one cup fresh or dried rose petals, 4 cups vinegar (champagne or apple cider vinegar), clean empty wine bottles, clean corks or if using a metal lid over a jar, cover the bottle with plastic wrap first because vinegar will eat away metal if in direct contact.
Directions: rinse and gently dry fresh rose petals (no need for dried). Pour vinegar into a sauce pan and heat to boiling point. Remove from heat immediately. Place rose petals in a mixing bowl and pour hot vinegar over them, cool. Pour the mixture into the wine bottles, cork and let sit for 3-6 weeks. Shake. Strain out the petals and refill bottles.


Photo from Bumblerootfoods
Scented Rose Honey (Kathleen Gips)
Ingredients: 1/2 cup dried or fresh, fragrant, pesticide-free rose petals (homegrown is best, do not use florist grown).
Directions: rinse and gently dry rose petals. Use scissors to cut off the white base of each petal (the bitter part). Chop the rose petals into small pieces on a cutting board. Pour the honey into a saucepan and heat over low for a minute or two. Remove the honey from heat and stir in the rose petals. Let cool.  Pour into a glass jar, yield one pint. 

A quick internet search will help you find scores of other recipes including rose hip sauce, rose petal ice-cubes (great for summer entertaining), rose syrup - try over crepes or pound cake. Also look for easy rose herbal sachet and potpourri recipes. Plus there are many ways to use rose hips in wreaths and dried canes for winter bouquets. Look for quality dried rose petals in natural grocery stores. Some Denver area shops that carry outstanding essential rose oil skin care and other herb products
Herbs & Art 
Apothecary Tinctura 
MoonDance Botanicals 

*There is no other herbal essential oil quite like rose oil, derived from 'Rosa damascena' and 'Rosa centifolia' for use as fragrance in perfumes, lotions and other cosmetics. Today, Bulgaria, Turkey, Morocco and France command the majority of rose oil production. It takes 180 pounds of damask rose petals to produce an ounce of rose oil or attar - the Arabic word that means 'essence' which sells for about $500.00. No wonder Cleopatra and ancient Romans had such high regard for the rose - almost bordering on obsession. They were known to use rose water in fountains, public baths and petals for stuffing pillows.  

Unknown Roses at Normandy American Cemetery
Roses truly speak from the heart - just look around. We decorate with roses for weddings, anniversaries, parades and final resting places. Roses symbolize love, devotion, celebration and life. Their long, rich history spans from thirty-five million year old rose fossil beds in Colorado at Florissant National Park to our first President who grew roses and named one after his mother which is still grown today, 'Mary Washington.' Roses grow in all fifty states and were designated America's national flower by Congress in 1986.  


Wednesday, November 16, 2016

Plant Failure to Success Part II

Finally I'm back with Part II of the new pollinator and herb beds I planted this past summer. Forgive my absence, I've been out watering our landscape because it's been in the 60s and 70s for so many weeks that if plants are as dehydrated as my hair and skin, then they are parched, thirsty and looking like they need an immediate moisture injection or some Neutrogena Hydro Boost Gel-Cream (yes, there is such a product, I saw it at Walgreens). Can you believe this fall weather we've been having? How are people supposed to get in the holiday..."brrr... it's cold out, I need to buy long underwear" spirit!  A change is forecast for later tonight, hope we get some rain or snow!

First, here's the link to Part I so you can pick up where I left off. I believe I was finishing up on how the new pollinator bed turned out. I said that it was nice and I still stand by that word, I'll even add pretty to the description and the best part, it will be very low water care once established. The exception is the magnolia shrub in the middle, which is on it's own drip line. Even today, November 16th, the plants look great, they are standing tall and the seed heads add interest and snack opportunities. The birds sneak in, peck away at the seeds while kicking out a mulch trail on the nearby concrete patio. I scold them a bit for making a mess, but just sweep it back each morning knowing they'll be back for more.

As with any new planting or plantings, it will take a few seasons for plants to take hold and establish their dependable good looks. It's true...new plants generally creep-crawl-leap in their early lives.

Here's the official "ta dah" final planting for the new pollinator bed dated 8-23 (planted in June). Most of the plants are from the Plant Select® program. If you're not familiar with Plant Select®, take some time to view their website and plant stories. I wrote a blog about PS back in 2015, still relevant - Plant Choices - Plant Select® Plant Smarter. 

I left some space for some of the larger plants to have room to grow, so please don't mind the gaps!


Here's the plant list, along with links from the common name to read more information. The first nine are from Plant Select® (more will be added next spring).

Heterotheca jonesii x villosa 'Goldhill'  Common name - Goldhill golden-aster

Osteospermum 'Avalanche' Common name - Avalanche white sun daisy 

Osteospermum barberiae var. compactum   Common name - PURPLE MOUNTAIN® sun daisy

Penstemon x mexicali  Common name -  RED ROCKS® penstemon

Salvia reptans  Common name - Autumn Sapphire™ sage

Agastache 'Pstessene'  Common name -  CORONADO® Red hyssop

Engelmannia peristenia   Common name - Engelmann's daisy 

Salvia pachyphylla Common name - Mojave Sage 

Veronica liwanensis Common name -  Turkish veronica

SALVIA lyrata 'Purple Volcano'  Common name - Purple volcano sage

Agastache 'Bolero'  Common name - Hyssop 

Liatris spicata 'Kobold'  Common name - Gayfeather 

Salvia officinalis ‘Berggarten’  Common name - Sage

Lavandula x intermedia 'Niko' Common name - Phenomenal Lavender

Magnolia 'Ann'  Common name - Magnolia

Additional photos from late summer through mid-Novembe:


Coronado® Red hyssop
RED ROCKS® penstemon
Avalanche white sun daisy 
NEW Pollinator Bed 11-15-2016


 Please check back soon for Part III and the new herb bed outcome.


Wednesday, November 2, 2016

Plant Failure to Success - Part I

Earlier in May I challenged myself to design and install three new planting beds that had failed my expectations to grow and perform well in our landscape. No doubt you can relate, most gardeners have had plants crash or disappoint. Looking back, when the plants first went in I dreamed about them looking like the perfect field of flowers blanketing the entrance to the Emerald City, you know... where the great and powerful Oz lived. I wonder if he pitched in and did any deadheading on his day's off, but I digress. 

Before you read too far, this blog will be Part I, so please check back soon for the "ta dah" completed beds.

If you want to check out the full "before" story before reading further, click on this link - plant failer. You'll see a pathetic before picture that I just can't bring myself to re-post again.

In a few words, the beds turned out very nicely, not perfect, but a fine start, it has the making of "good bones" as they say. 

I could write paragraphs about the torture and turmoil I endured preparing the soil and working out in the hot sun, but you know that's a given. In fact we did have a very hot summer and CO soils just ain't nice to work in, they've got all that sticky clay in there.

I did most of the manual work of bed prep and transplanting some of the herbs in early morning or evening when the areas were shaded. The best part was that I didn't need to hit the gym on a regular basis during the root pulling weeks - my arms, back and legs were getting in shape, almost buff, okay that's an exaggeration. The body parts that hurt the most were my hands from all the root pulling (yes, I wore gloves). I was tempted to go to a manicure shop and request one of those warm wax coating treatments just to see if they'd feel better deep down. I didn't go, I just opted to push through, using arnica cream at night minutes before my tired head hit the pillow.

The soil wasn't really all that bad since they had been prepped five years prior when the new landscape went in. But I added several bags of expanded shale to further break up the clay soil and improve drainage. I also added some compost from my pile and a few bags of locally made amendment, but not too much, the plants going in needed excellent drainage not high fertility. 

Shopping for new plants was fun, sort of. I had to hit several places to complete the list from my plan and I still have some holes because some plants just weren't available or sold out. That's why there's always next year, right fellow gardeners!

The plan - the former herb area became a pollinator bed consisting of mainly Plant Select® plants while the former rose bed became the new herb bed. I kept some open real estate in the herb bed to pop in some annual vegetables or more herbs.

Here is one group of plants after some garden center power shopping in mid-June. I tried to purchase mainly four-inch pots over one gallon size, smaller ones are so much easier to plant and they catch up quickly in growth and size.


Below is the mostly empty pollinator bed, I kept a large lavender and sage plant, I knew they wouldn't transplant well to the new herb bed. It isn't that large an area, about 13' x 13'.


Plant Select® plants never disappoint!


End of Part I, please check back soon!

Saturday, October 22, 2016

New Perspective

You may recall that I recently wrote about the difficulty of coming up with a title for each new blog. The title for this one was from a casual friendly comment from the young woman who bagged my groceries earlier today. Her name is Taylor and next time I see her I'll give her my business card so she can read this entry. Thank you Taylor!

Now some background and I'll bring it around to gardening shortly. I have a new set of eyes. Eyes...you say Betty, how so? Getting straight to the point, I had cataract surgery a few weeks ago and am still getting used to my new way of viewing the world. Most people who have this surgery are older than me (way older), my friends say things like "oh, my eighty-five year-old mother just had cataract surgery and she's doing just fine." Fine? define fine please. "She can see her TV programs better." Hmm, that's all well and good, but for an active gardener who spends more time outside than watching TV, nature looks different after cataract surgery...way different. For me, things feel closer, look larger, more than huge, even the pumpkins look bigger, dare I say planet sized.  And the weirdest change was that for the first couple of weeks after surgery I physically felt shorter - like my body shrunk five inches, explain that!  

And colors, oh my...fall leaves have more saturated color - they are deeper, sharper and feel more alive. A pile of fallen ash leaves aren't just plain butter-colored yellow anymore, to me they are practically neon, unexpectedly vivid - like seeing the bright sun after a gray dreary week of snow in late February.... is this reaction possible with a simple glance at a mound of leaves? The other day on my morning walk I noticed how perfect, yet simple and distinct the fall colors and fruit were on a crabapple tree. Plus I could see them far away without any glasses! It makes me wonder what colors I used to see...milk toast taupe?

I'm certainly no eye doctor, just a gal who had very poor eyesight and has worn glasses since the second grade so it will be hard for me to explain how and why these changes occurred. I'll try.

Internet Photo
First some basic eye anatomy and functions which act similarly to a camera. Light first encounters the cornea which is the front, center clear part of the eye (it's where you place a contact lens if you wear them). The cornea acts like the camera lens. Behind the cornea is the iris (colored part of the eye) and pupil (middle black part of the iris). Our iris eye muscles allow the pupil to react to light that reaches to the back of the eye, sort of like the aperture of a camera. 

The eye's auto focus is the lens - the clear area made up of water and proteins located behind the pupil. The retina is the thin, transparent inner wall of the eye and like old school camera film it acts like an electronic sensor that converts images to signals before sending them to the brain so you know you're looking at a zebra or pink rose. The key to good, sharp vision is the lens being clear so that the retina can change the light to nerve signals that are then sent to the brain.

A cataract develops when some of the protein in the lens clumps and forms clouds which reduces the light that reaches the retina. Suffice it say that life gets blurry as cataracts grow. Colors dull out, objects may take on a brownish hue. Headlights at night may seem very bright and glaring. It's been suggested that Monet the artist suffered from cataracts and his paintings lost some detail while his use of colors became more striking. Lucky us he suffered from cataracts!

And the cause or causes? There is a fairly long list of risk factors, age being one. 40 and 50-year-olds can develop cataracts but may or may not cause any vision issues. Over the age of 60 cataracts can worsen. Read about other possible factors here from the Mayo Cliniccataracts. I think mine came about from exposure to ultraviolet radiation from sunlight. I got a lot of sun while life guarding and teaching swimming lessons during summers in college, and the sun tanning years weren't good for my eyes or my skin. Then there's family history, both parents had cataracts. I also had very high myopia. Myopia is nearsightedness - not being able to see far away. Normal visioned people have 20/20 acuity. So a person who is 20/40 must be 20 feet away to clearly see the same object a person with 20/20 vision can see 40 feet away. I was 20/1000 before cataract surgery, (a legally blind person is 20/200). Yep, I couldn't see the broad side of a red barn without my glasses unless I was 20 feet away.
 
According to the World Health Organization 51% of world blindness (over 20 million people) is due to cataracts. As you can guess, many developing countries or places where people do not have access to surgery suffer from blindness due to cataracts. My ophthalmologist told me recently that he removed a cataract from a young man in his thirties during one of his mission trips to Mexico. Because the man was blind in the other eye, there was worry going into the surgery. He had a very good result. The man was so overwhelmed and appreciative in seeing his young children for the first time that he cried and cried with joy.

Cataract surgery is popular and is performed on over three million Americans a year (I guess I'm now in the popular crowd). It's not too complicated and very painless. The surgeon removes the clouded lens and replaces it with a clear, plastic intraocular lens. In my case I had surgery on both eyes, two weeks apart. All good and bonus - no kitchen clean up duty for a few days post surgery!

The outcome for most everyone is very good, they see 20/20 or 20/40. I'm seeing great now and I'm more than grateful. The one downside is the opposite vision issue - farsightedness or not being able to see or read up close. I also had this condition before the surgery but my glasses corrected the problem. I have a pair of inexpensive readers within reach or around my neck most of the time. I haven't purchased a fake pearl necklace chain for my readers, but Christmas is coming up and I've dropped several hints. 

As for the new perspective, heck yea, I've got one, I've got as many as my eyes can see. I don't wear expensive corrective glasses for distance anymore - they minimized objects and fogged up on cold days. With the cataracts gone I'm seeing genuine plant colors, many in their fall glory. I can't wait until next spring to see what pink tulips and all shades in between truly look like. In the meantime I'll embrace the various tones, shadows and subtleties of Colorado snow and Bronco orange-colored sunsets.  


Wednesday, October 12, 2016

Carol's Pumpkins

Carol knows pumpkins and had a great summer growing them. Check out her blog posting from CO-Horts for a very good read and tips on making them last. 


Photo from Colorado Pumpkin Patch

All America Enchanting Pumpkins 

Posted by Carol O'Meara, Boulder County Extension 

"When I plant my garden each year, two things are guaranteed to happen: I arrogantly predict which crop is going to be a beauty that year, and Mother Nature responds by turning a different crop into the blockbuster. We’ve never seen eye to eye so it came as no surprise to me that, this year, pumpkins ran amok in the garden."  Continue reading....