Friday, September 18, 2020

Time to Plant Garlic 2020

Recently harvested garlic

The good word is out about home grown garlic. And the word is flavor. Flavor you say? Think about it, when you buy a garlic bulb at the supermarket for a recipe or sauce, what are you buying, what kind of flavor do you expect? 

If you answer that there's only a bin of garlic to choose from and it tastes, well ... like it always does. That's it, there’s your lack of flavor and variety - we’re given just one type of garlic to bring home to finish our favorite lasagna dish. Imagine if you could only buy one type of pepper or apple for the rest of your life…no jalapeno, are you kidding, no honeycrisp!!!

The only way you’ll have a wider selection of garlic, which means a broader range of taste and characteristics is to grow your own, and fall planting is the best time to plant.

I grow a lot of garlic for a home gardener. I plant about three pounds every fall. Depending on variety, one pound of garlic will grow and net anywhere from 40 to 70 bulbs. 
 
Here's how it works. Each clove on the planting stock bulb is planted, which nets you a full bulb when you harvest next spring. Keep this easy math in mind when you order online or purchase locally. Independent garden centers are now selling garlic planting stock, some stores have an awesome selection so call or run by and check out what they have.  
 
Garden retailers generally package garlic from one to three planting bulbs, very doable for small spaces. Also check local farmer’s markets for planting stock. Mail order availability sells quickly in the fall, get going.

For two reasons it’s best to start with quality planting stock from a garden center or online reputable garlic grower versus buying grocery store garlic that you eat, to plant. You don’t know if grocery store garlic is treated to prevent it from sprouting or how it was stored, plus it’s only one type, again, the whole point is to expand your garlic palate.
 
Fall Planted Softneck Garlic in May

Garlic originated from central Asia thousands of years ago in climates that are very close to Colorado. With fall planting we’re giving the cloves a full 8 to 9 months to grow and develop into nice, good sized bulbs. 
 
There’s nothing more satisfying to a gardener than fall planting garlic as the icing on the entire planting season. It should be doubly true this fall because our summer growing season was challenging with the extreme heat and early cold snap.
 
Hands down, garlic is one of the easiest crops (it's actually an herb) to plant, beginner gardeners should have a good result if the planting soil and conditions are fair to good.

Garlic is in the allium genus, same as onions. There are two subgroups of garlic, commonly called hardneck and softneck. You’ll want to plant some of both. Hardnecks have outstanding flavor, and are highly recommended for making salad dressings and pressed fresh over vegetables. They are also delicious when baked or eaten raw for health benefits.
 
Hardneck Flower Stalks - Scapes

 
Hardneck bulbs have fewer cloves and are very easy to peel (much appreciated by gourmet chefs, including yourself). Hardnecks have a much shorter shelf life than softnecks, ranging from 3 to 6 months or so after curing. Hardnecks also grow a flower stock (scape) in late spring. It's recommended to cut this off a couple of weeks before harvesting to promote growth to the bulb. I've written about this procedure in other blogs, click here. Also, don't toss the scapes, they are so flavorful to eat, read more here.

garlic chives grown from left over garlic cloves
Softnecks do not flower, which makes them easier for braiding and harvesting by commercial growers. This is probably why we don't have hardnecks available for purchase on grocery shelves. 
 
Softnecks have a longer storage than hardnecks, up to 9 or 10 months (this is the type you find in grocery stores). Softnecks can be mild in taste or have quite a bite. Just as hardneck you will be able to taste the differences the more you grow.  
 
There are many cloves on softneck bulbs, so when planting use the largest cloves. Save the smaller ones for cooking or plant them in a pot indoors and grow them like onion chives (snip off the greens to use in dishes).

When shopping for your bulbs, keep in mind that there are several variety options in both the hardneck and softneck groups. Check the descriptions when shopping local and try different ones, it's fun!
 
Keep in mind that what you plant this year can be planted again next year, so you don’t have to purchase planting stock each and every year unless you want to try new varieties.  

I plant in raised beds in a sunny location. Sun is important for growing garlic. You can plant cloves in part shade right now, just as long as after the winter solstice the area starts getting more sun, then full sun by the June to July harvest. You can tuck them through the landscape if you have good soil, sun and no competition from other plant roots. Just remember where they are planted so you can water them through the winter if moisture is scarce.


My soil is loose and well amended. Cloves don't like growing in heavy clay or icky soil. I add a balanced fertilizer like a 10-10-10 a few weeks before planting. Garlic isn’t a high nitrogen feeder, but they do need nitrogen. Too little nitrogen may produce yellow plants, less vigor and smaller bulbs.

Gather your materials prior to planting - bulbs, planting labels, trowel, and mulch. Remember that one bulb will grow from one planted clove so plan accordingly. 

I place the cloves on top of the soil spaced 4 to 6 inches apart with the rows 10 or 12 inches apart. Plant 2-3 inches deep. I take my trowel and create the planting hole, often the soil is so workable that I can just push it down into the soil. Be sure to label each row or group. OR you can dig a 3-inch trench and place the cloves 4 to 6 inches apart, then cover with soil.
 
Again, the largest cloves planted will produce the biggest bulbs.
 
See my video below for the visual.

After planting I place a 2-3 inch layer of mulch over the bed and water it well.  Through the winter I will renew the mulch and water once or twice a month if it’s been dry. If spring is very rainy I’ll remove the mulch so the growing bulbs won’t risk getting mold. 

This article is a revised from an earlier version. Feel free to search this blog for other garlic articles, it's one of my favorite herbs so I've written often on the topic. Click here for my Denver Post video on harvesting fall planted garlic in early summer.


"Shallots are for babies; Onions are for men; Garlic is for heroes."  
Author unknown


Friday, September 11, 2020

The Week that Was - Whiplash Snow and Cold

Harvested Tomatoes 2020 'Green Zebra,' 'Hawaiian Pineapple,' 'Celebrity'

My arm and shoulder muscles are still feeling some strain from the manic plant covering and outdoor preparation before the snow and cold earlier in the week. The most tedious was harvesting the tomatoes on September 7 in ninety degree heat and air so thick from forest fire smoke I thought our neighborhood was on fire.

Reaching in and through the vines looking for tomatoes was every bit like reaching through a jungle of dense foliage in a far off place. I had to use gentle care in cutting the large Hawaiian Pineapple tomatoes off the vines without a nick. Two ended up with nicks, they went into the chili the next day. 

Deciding not to protect the tomatoes was difficult, I decided to focus covering some of the perennials in bloom and those that will bloom soon like the glorious Plant Select® autumn sapphire sage.

What was learned from this early record setting September snow and cold?

  • It took more time to uncover the sheets, floating row covers and plastic from the plants. Next step is to store it back in the shed, I call it landscape laundry management - wet, dry, fold and put away. 
  • The uncovered perennial plants are happy, the ones in full bloom, like the spring planted blue mist spirea haven't skipped a beat, bees are back in action as I write this. This makes me happy.
  • Tomatoes - more proof that normal summer growing seasons seem more infrequent. This was truly a challenging summer with the extreme heat and now, the early cold snap. No major lesson here, other than there's next year and I'll never give up growing them. 
  • How to ripen green tomatoes click here.  
  • The moisture from the storm was a welcome relief no matter how much a bother it was covering. The rain gauge says we received close to an inch. We'll take every drop. 

Ferris loves the snow, we're looking forward to more of it, but please, not until Thanksgiving, rain is okay.


Friday, September 4, 2020

Cold and Snow is Coming Soon!

"Then, all of a sudden, when you least expected it ... nighttime temperatures plunged to the 30s and it snowed, right smack dab near the end of a pretty good tomato and pepper year."


Sentiment expressed by gardeners everywhere!

As gardeners, we are more than aware of sudden weather related events all through the growing season. Snow over Mother's Day, yes, happens often, and guess what, a few hours after a warm Labor Day it's supposed to happen again.

The weather experts are predicting another weather whiplash with nights in the 30s plus snow overnight into September 8. The temperature drop in just a few hours will be sixty (give or take) degrees, yikes and oh darn - not good on our plants. They also say to expect the next four nights to be well below 40 degrees. 

To give you some perspective, I did some checking on the last ten years and the dates our temperatures dropped to 40 and below in September. October can be similar and last October is proof, read here to jog your memory. 

September 2018 we had six nights at 40 degrees and below starting on the 26th. October of that same near was cold too, nights stayed mostly in the low 40s to low 30s the entire month. That would have been a tough fall to extend the warm crop growing season.

September 2014 we had three nights from the 11th to 13th well below 40, the last night was down to 30 degrees.

September 2013 it wasn't until month's end like '18 when we hit the 30s at night - 27th through the 29th. 

September 2011 we had high 30s on the 21st and 22nd.

All the other years in between held temperatures pretty well in the mid to high forties and fifties, not bad.

What does this mean for our warm-season crops? The list includes - tomato, pepper, eggplant, tomatillo, basil, squash, pumpkin, okra, corn, bean, cucumber, and melons. Ornamental annuals like petunia, geranium, lantana and many more. Plus, don't forget perennial plants that were just planted this spring, summer or very recently, they are not established, so they are vulnerable. In two words it means - not good. This group of plants may not survive well or at all if left unprotected. It is doubtful crops will continue to ripen, and remain healthy through this snap of cold temperatures.

What to do - if you are able, the day before or day of predicted cold, fully drape all warm loving crops, annuals and new plantings with some sort of cover.

It's also a very good idea to deeply water every plant in the landscape, believe it or not, moist plant roots weather cold snaps much better than dry roots. A wise landscape designer friend told me years ago that the ideal fall transition for landscape plants is one that gradually gets colder with plenty of rain to help them have wet feet (roots) headed into winter.

It is your choice. Cover your plants. Or don't.

Try to use light weight sheets or floating row covers and cloak the plants entirely, trapping in the warmth from the soil. 

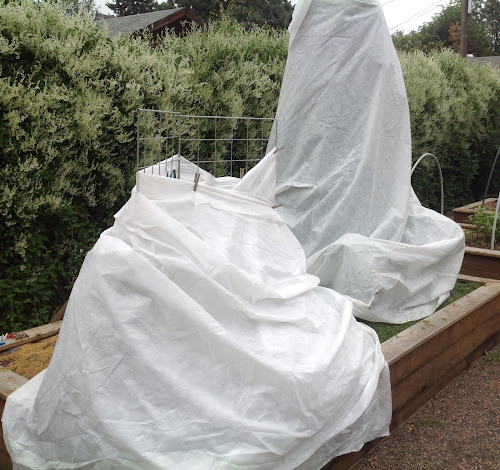
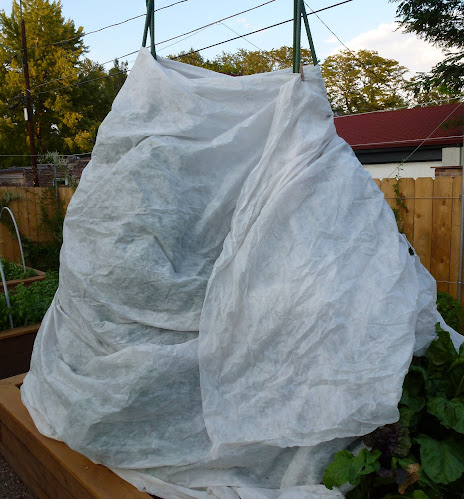
In the photo below, I wrapped two climbing bean plants. Notice how the cover goes all the way to the bottom of the plants, touching the raised bed cap. I should have (maybe I did later) used clothes pins to keep the flap from opening. These plants were right next to some Swiss chard which I knew would be fine in the cold. I used a heavy weight floating row cover which protects plants down to 28 degrees.

In the photo below I used an old electric blanket to cover a determinate tomato. I clipped the blanket edges to the cage. Ideally, the top should be covered to trap in warm air all around the plant.

A blanket isn't recommended when rain or snow are accompanied with the cold, unless you place a plastic tarp over the blanket to keep it dry. A light sheet or floating row cover is better since lighter fabric or frcover doesn't weigh down the plant when wet. Avoid using plastic directly over the plant, it just transfers cold to the foliage and fruit. 

A good sized bucket or empty plant container over a recently planted plant should work just fine if it isn't in direct contact with the foliage.

Covering large and tall ornamental containers may need some posts, poles or sticks to support the size. The container below doesn't get direct rain or snow, so I just wrapped it with a light sheet and it held in place. An exposed container would need support to attach the material.  

Below, I used a tomato cage over a geranium to hold the floating row cover in place, worked great!

Be sure to uncover during the day when temperatures reach the 50s or at least high 40s. Dry out the cover materials and use them again the next night. This is tedious work, but you'll be rewarded with more vegetables in September and not having to replace recently planted perennials.

Hoop houses work great on smaller, shorter vegetable plantings or plantings through the garden. Just poke in the rebar and place the pvc pipe over the rebar to hold hoops in place. Clip on a floating row cover, light sheet or plastic as long as it doesn't touch the plants. Check out my Denver Post video here on building inexpensive hoop houses.

As insurance, I'm going to wrap the sprinkler pipes with an old blanket and cover the blanket with a plastic tarp or plastic. It's easy to do if you have the materials on hand. 

I'm still shaking my head, I cannot believe it is going to be close to one hundred degrees tomorrow, September 5 and three days later snow and cold. Really!?