Sunday, March 16, 2025

Indoor Plants Part II - Common Pests and Disease

Houseplant Health Part II

The daily excitement continues as we draw closer to spring and outdoor gardening. Until the dormant shades of outdoor plants come to life let’s focus on indoor plants which provide year-round enjoyment and beauty—most of the time. On occasion insect pests and diseases can rear their annoying heads. Below are some common houseplant ailments and control options.

1) Spider mite pests are extremely small and mostly invisible to the naked eye. They thrive on plants in dry, low humidity indoor and outdoor environments. Evidence of spider mite presence is the silky webbing they make around and under leaves and plant parts. Their straw-like piercing-sucking mouthparts cause visible damage to leaves by removing the green pigment resulting in dull, stippled or a spotted, bleached out appearance. Damaged leaves can also turn silver, brown or yellow and fall off. Severe spider mite infestations may cause plant death. Check for spider mites by tapping leaves over a white piece of paper. If tiny dots move about, then further confirm their presence by folding the paper which will leave smeared red/brown streaks.

Try washing spider mites off household plants with a gentle spray of water in a tub, if possible. Insecticidal soaps, and horticultural oils are helpful, be sure to spray the undersides of leaves.

Spider mites favor Norfolk Island pine, schefflera, ivy, dracaena, citrus, begonia, prayer plant and palm.

Online photo from https://www.plantipeeps.com.au/blogs/planti-how-to/plant-pests-101-spider-mites 
2) The mention of fungus gnat pests can cause gardeners to emote from their incessant slow flying around plants and one’s face. A very common houseplant nuisance, fungus gnats are small, ¼-inch, weak black flies that do not bite or cause plant damage. Fungus gnat larvae feed on decaying plant matter, fungi, algae and plant roots in the top 2-3 inches of soil. Their life cycle is short, 3 to 4 weeks from egg to adult, with year-round reproduction. One adult female can lay up to 200 eggs in her short ten-day life in houseplant soil and cracks.

Fungus gnats are more of a cosmetic and flying annoyance than a cause for plant damage.

Online photo from https://plantperfect.com/how-to-deal-with-fungus-gnats-on-houseplants/

Fungus gnats prefer moist soil for egg laying. One control is to let soil media dry before each watering. Consider adding a thin layer of coarse sand or tiny rock over the top of the soil which discourages egg laying. An easy to find product sold at garden centers and online is a natural occurring bacterium called Bacillus thurengiensis israelensis, or Bti for short, which kills fungus gnat larvae.

Bti is also effective for use on mosquito larvae outside in water features and is labeled as being safe around people, pets, plants and livestock.

Another idea is to try sticky yellow cards to trap adults (and other pest insects.) Fungus gnats can be issues for just about any indoor houseplant.  

Photo by Betty Cahill

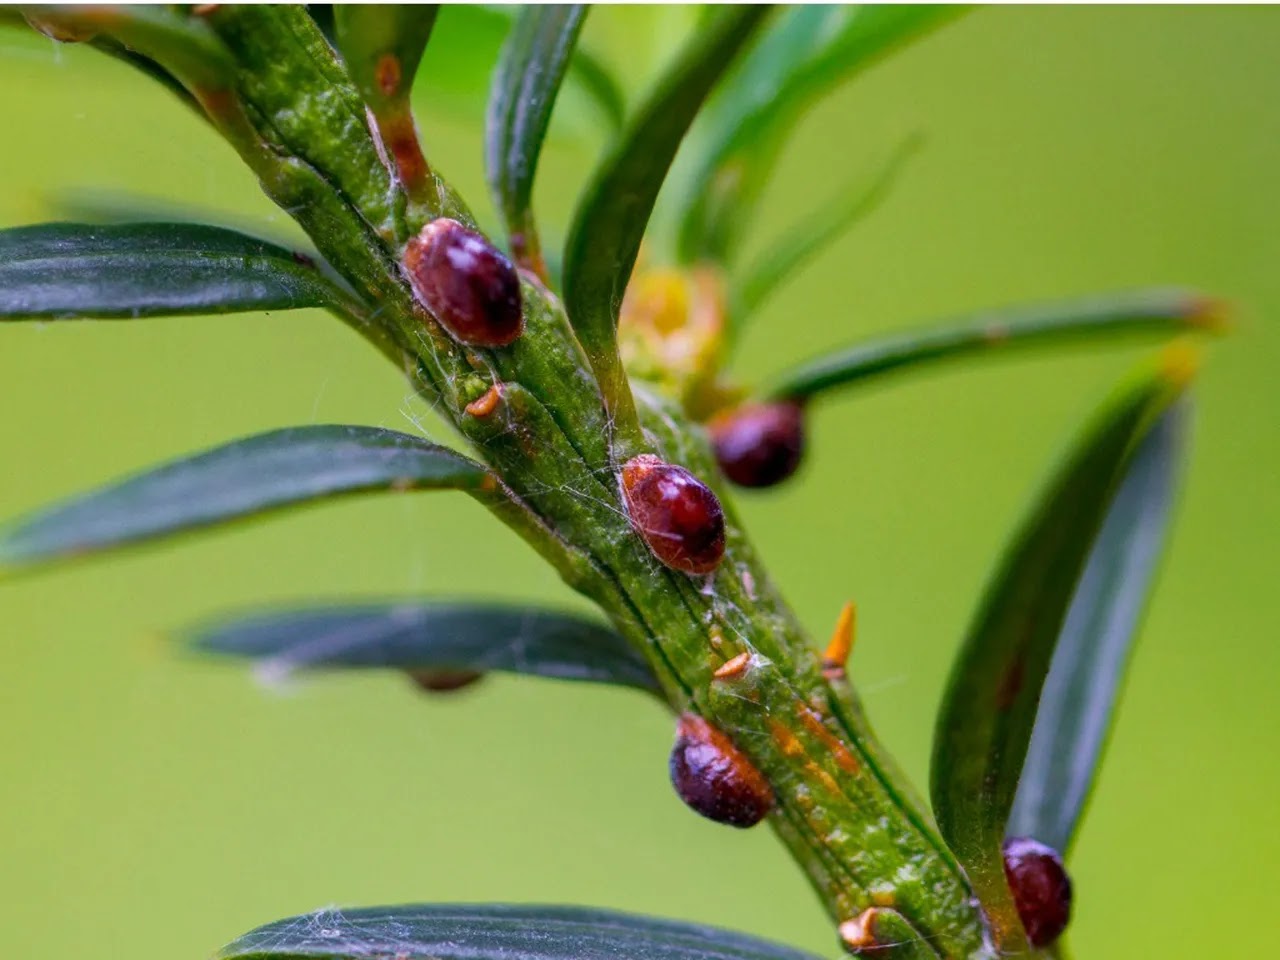
3) Two types of round to oval shaped small scale pest insects look like tiny bumps on leaves and along stems. Armored scale pests are 1/8 inch long with a hard, protective shell; soft scale, a bit larger, are covered with a thick, waxy coat. Adults do not noticeably move about plant leaf and stem surfaces. Females lay eggs under the protective coating, but in their “crawler” stage they move and find a feeding site and develop their protective shell.

They feed on plant sap in plant tissue leading to reduced overall vitality. Leaves can turn yellow, wilt and drop prematurely. Severe, prolonged damage can cause plant death. Their honeydew excrement causes shiny stickiness around plants, furniture and nearby floors.

Small infestations of scale pests can be removed by carefully picking or scraping them off the plant with a soft bristled toothbrush, or dab each scale insect with an alcohol-soaked cotton swab or Q-Tip. These are difficult pests to kill; insecticidal soaps and horticulture oils can provide some control.

Scale insects favor bay leaf, schefflera, citrus, ferns, crotons, snake plant and Ficus. 

Online photo from https://www.gardeningknowhow.com/plant-problems/pests/insects/control-plant-scale.htm

4) Environmental conditions are more often the cause of indoor plant diseases and not often found on plants that are healthy and thriving. Make sure plants are getting what they need in terms of appropriate light, water, fertilizer, soil quality and drainage. Too little or too much of any of these conditions weaken and stress a plant’s vigor and make it more prone to disease.

Practicing good plant housekeeping is a very good habit to adopt. When plants show signs of trouble, try grooming the plant where there are issues. Remove fallen leaves and flowers promptly, quarantine plants that are suspected to have an issue until it is resolved. Avoid splashing water onto plant leaves, and protect plants from direct heat vents and cold drafts.

Diseases can arise so consider taking photos of troubled plants, up close and a full profile. Show the photos to your reputable garden center expert or nearby Colorado State University Extension office or online help desk for diagnosis. Be prepared to answer questions about the plant’s growing conditions and your care routine. 

Other Tips

Read all label application instructions when using insecticidal products on indoor plants. Try to spray outside if it is not too cold.

If possible, use various non-chemical options instead of just one method.

Avoid introducing pests into homes by first inspecting newly purchased plants or ones brought inside after the summer season. If insects are present, isolate the plant and use control measures.

Humidity can be slightly increased by placing houseplants on a small pebble tray where water sits below the pebbles and not directly in contact with the bottom of the plant. Plants grouped together can boost humidity.  

Photo by Betty Cahill

Replace severely pest or disease affected plants.

Resources

Ask Extension https://ask2.extension.org/

CSU Extension Offices https://extension.colostate.edu/field-offices/

Houseplant General Information https://planttalk.colostate.edu/topics/houseplants/

Houseplant Pests https://agsci.colostate.edu/agbio/ipm-pests/houseplant-pests/


Monday, March 3, 2025

Indoor Plants Part I - Cultural Care and Issues


Fertilizing houseplants during their active growing season from early spring through mid-fall is necessary for positive plant health. (Betty Cahill, Special to The Denver Post)
Denver, CO - MARCH 15: Denver Post garden contributor Betty Cahill demonstrates how to properly divide and move plants for this week's DPTV gardening tutorial.  Plants are divided or moved because they are overgrown, overcrowded, lack vigor or are in the wrong place. Spring is the best time to move summer and fall blooming plants. (Photo by Lindsay Pierce/The Denver Post)
PUBLISHED:

We appreciate our houseplants for many reasons; the pros far outweigh the cons.

Houseplants can be a cherished reminder when given as special gifts from family and friends. My sister and I have a pathos houseplant that started as a cutting from our mom, and before that her mother, most likely dating back to the 1960s or before (we can only guess).

An inexpensive moisture meter is as handy as your finger to determine soil moisture levels. (Betty Cahill, Special to The Denver Post)

Their aesthetic appeal is obvious, too: They add beauty, interest, warmth and vivacity to spaces throughout a home. Studies over the years say houseplants reduce stress, enhance moods and improve study and work performance. We might all benefit from having houseplants.

Houseplant maintenance simply requires time and attention. Learn to recognize ailments early on so they do not become unsightly, infect surrounding plants, or lead to plant demise. It is a sad day for anyone who has to take a sick or dead plant outside to the compost or garbage bin.

Let’s look at some of the common culture care and control issues. Next time, we’ll talk about pests and diseases.

Culture care

Since houseplants are confined to a smaller space in a container, their roots cannot spread wider or deeper for sustenance. They totally depend on us for their care.

A plant’s cultural needs — watering, fertilizer, container size and house location — vary, so learning about each plant’s growing requirements is helpful for successful plant health and vigor.

Indoor, year-round house temperatures between 60 and 75 degrees (cooler at night) are agreeable to most plants. Read the plant tag, visit with the houseplant expert where purchased and research online for additional information.

Wilted leaves can mean the plant needs water, or the plant soil is too wet. Instead of watering on a weekly set schedule, consider the growing conditions around the plant. If the light conditions are low, plants generally need less water. When the heat is on and the air is dry, plants may need more water. In higher humidity conditions or cooler air, plants generally need less water.

There are easy ways to check if it is time to water. Lift the plant if possible; a dry plant obviously will be lighter than a well-watered plant.

Inspect the soil surface for dryness and poke your finger into the potting mix as an easy dipstick method. If it’s dry beyond the second knuckle, or over an inch or more down, and the soil looks lighter, it most likely needs watering. Cacti and some succulent plants are exceptions; they can take dryer conditions longer.

An inexpensive moisture meter is as handy as your finger to determine soil moisture levels. Check out some of the newer plant watering gizmos that have come on the market, like the inexpensive battery plant alarm moisture sensor that flashes red when water is needed.

Besides drooping leaves, underwatered plants can result in dried or yellow leaves, brown leaf tips, lackluster foliage or loss of glossy leaf shine. Unfortunately, these symptoms can often be the same as overwatered plants.

Hydrate by watering thoroughly, using slightly warm or tepid water. Plants can be sensitive to hard (alkaline) and soft (salty) water. Use a watering can that has a slender spout and can easily be moved to all sides of the container. Decorative watering bulb devices are not only handy, but they also provide a steady, slow supply of water to plant roots.

Some houseplants with sensitive leaves like African violets prefer being watered from the bottom. Simply fill the saucer with water and allow time for the soil to wick up the moisture. Add water until the soil surface is damp and avoid getting water on any of the leaves.

If the plant soil is dry to the point of seeing a gap where the soil has pulled away from the inside of the container, then normal watering using a watering can may not be enough. Try immersing the entire container up to where the bottom foliage meets the soil in a sink or bucket of warm to tepid water and allow it to soak for 20 minutes or so. Let the pot drain well before moving it back to its regular location.

Extremely dehydrated plants can recover with thorough watering, but any yellow or dried leaves will not turn green again. Trim off dead, brown and yellowed leaves with scissors so it is less noticeable.

Overwatering a plant leads to soggy soil that deprives roots of oxygen and can cause root rot. If that happens, it might be too late to save the plant. Confirm root rot by pulling the plant out of the pot and inspecting the roots. If they are mushy, brown or black, and sometimes have an odor, then root rot is probable. Drain any excess water from its tray and let the plant dry out. Cut off yellowed, browned and dead-looking stems. Move the plant into more light if possible and see if it recovers by sprouting new growth.

Fertilizing houseplants during their active growing season from early spring through mid-fall is necessary for positive plant health. Plus, regular watering constantly flushes fertilizers through and out of the soil. Plant food comes in different strengths and types including liquid and granular. Follow package directions and avoid using them when plants are sick and stressed.


Extremely dehydrated plants can recover with thorough watering, but any yellow or dried leaves will not turn green again. (Betty Cahill, Special to The Denver Post)


Resource

Houseplant Care https://planttalk.colostate.edu/topics/houseplants/


Betty Cahill is a freelance writer specializing in gardening


Saturday, March 1, 2025

Spring is Near, what's the Weather Predicting 2025?

Your guess is as good as mine for March weather. Below is what NOAA is predicting. 

Whatever storms still come our way, use the nice days to get outside, pull the early weeds, cut back ornamental grasses and other putzing that you can fit in. Don't forget to point your smiling face toward the warming sun.


Wednesday, February 12, 2025

Seed Starting Indoors 2025


Using a bottom heat mat under the seed tray is one of the best investments for starting seeds since they warm up the soil which can speed up seed germination. (Betty Cahill, Special to The Denver Post)
Denver, CO - MARCH 15: Denver Post garden contributor Betty Cahill demonstrates how to properly divide and move plants for this week's DPTV gardening tutorial.  Plants are divided or moved because they are overgrown, overcrowded, lack vigor or are in the wrong place. Spring is the best time to move summer and fall blooming plants. (Photo by Lindsay Pierce/The Denver Post)
PUBLISHED:

Drum roll, please: We are six weeks away from the first day of spring. Recent warm Colorado days have previewed the changing seasons, but we know that along the Front Range, extreme cold weather events can occur in April or May.

No matter the weather, now it is time to get your indoor seed supplies ready to go.

Below are my most reliable seed-starting tips. Have there been years when germination has been spotty or not at all? Sure, errors happen, or the operator (me) uses seeds that a too old, which is frustrating because time is lost and a do-over is required.

Biodegradable pots are popular for seeding, but in Colorado outdoor soils are generally too dry to be planted with the new transplant. (Betty Cahill, Special to The Denver Post)

Test your seed viability by scattering several seeds on a damp paper towel, then fold the towel and place in a sealed plastic bag near a sunny window. If less than half the seeds have sprouted after 10 days, buy new seeds. Or do as I do: Trek to your favorite garden center, purchase new seeds every year, or every other year, and rest assured that germination will be good to very good.

Timing

The most important seed-growing information is right on the seed packet. The correct time to directly seed indoors varies by plant type, generally ranging from two weeks to 16 weeks prior to the final spring frost (which is around May 10 along the Front Range). This time frame does not include the days to weeks the seed needs to germinate or emerge from the soil.

This indoor growing time also does not include the week it takes to “harden off,” or toughen up the transplant to outdoor growing conditions. For instance, if the seed packet says tomatoes should be started five to seven weeks prior to the last frost date and seed emergence is anywhere from seven to 21 days, add seven hardening-off days and the best time to directly seed this tomato variety indoors is mid-March.

If the outdoor soil is too wet, or if there is snow on the ground around planting time, then the transplant will need to remain indoors and well cared for with water and fertilizer. Weather in Colorado has taught many a gardener all about patience when getting the spring garden planted.

Indoor seeding tips

  1. In addition to store-bought seed starting trays and kits, don’t overlook items from home like yogurt cups, egg cartons and plastic produce packages to start seeds. Be sure to clean and sterilize all previously used containers with soap and hot water, then wipe them with diluted hydrogen peroxide or bleach and rinse well prior to use.

Biodegradable pots are popular, but in Colorado outdoor soils are generally too dry to be planted with the new transplant. Remove the plant first from the biodegradable container before planting for the best growth outcome.


Remove the plastic wrap or cover domes immediately after germination and then place the tray(s) under grow lights. (Betty Cahill, Special to The Denver Post)

2. Poke or drill drainage holes in all containers if not already done. Then use a label system for each plant or tray with purchased plant markers or cut up some of the plastic tubs or lids and make your own.

3. Always use brand-new potting soil designated for indoor seeding. If the potting soil bag label says there is added fertilizer, then take care not to add too much more fertilizer while the seeds are germinating and during the plant’s early growth.

4. Moist soil is easier to work with before adding seeds. Either add water to the bag of soil if it is dry or fill the planting container and moisten with water prior to seeding.

5. Fill containers with potting soil, poke holes to drop the seed in using a sterilized chopstick or similar tool. The seed packet tells how deep the seed goes in the soil, or if they can rest on top of the soil only needing light to germinate.

6. For vegetables: Drop two seeds in each hole, and later, when the stronger one is up and growing, cut off the weaker one to avoid damaging nearby roots. Cover the seed tray with clear plastic or a dome until the seeds emerge. The tray does not have to be under lights or near a window during this stage.

7. Using a bottom heat mat under the seed tray is one of the best investments for starting seeds since they warm up the soil which can speed up seed germination. Some gardeners find warmth for the seed trays when they are placed on top of refrigerators or other appliances. If using a seed mat, be sure to plug the electrical cord directly into the wall socket and not into the light timer, since the heat mat should always be on until the plants are up and growing well on their own.

8. Remove the plastic wrap or cover domes immediately after germination and then place the tray(s) under grow lights. Growing results are generally more reliable with either LED or fluorescent lighting than solely depending on a sunny window.

Place the newly emerged seeds close, a few inches undernearth the grow lights. Keep an eye on the foliage and move the lights up if plants begin to brown at the leaf tips.

Use a timer and keep the lights on for 14-16 hours each day, off for the remainder of the day.

9. Place a small fan near, not necessarily directly over, the seedling trays. Keep it on 24/7 at the lowest setting until the plants are up and growing well, usually after two or three weeks. Air circulation is the best defense against seedlings suddenly collapsing and dying (called damping off disease).

Seedlings prefer to be watered with room temperature water so fill a clean watering can with water and leave it close by. Use half to quarter strength liquid fertilizer for watering every other time.

Transplants can be potted up to a larger container as they grow. Look for at least three sets of leaves on the plant. (Betty Cahill, Special to The Denver Post)

10. To prevent damping off, avoid overwatering and never let the trays or containers stand in water for any length of time. Water lapses can lead to plant death, too.

My go-to for watering is using a capillary mat under the seed tray. They look and feel like felt and are very absorbent. They are sold in rolls or sheets at garden centers and online. Cut the mat to the size of your tray. Mats are reusable from year to year and machine washable on the gentle cycle (air dry). Simply pour some room temperature water over the mat about every other day or as needed and leave it to the soil and seeds to soak up the water they need.

11. Transplants can be potted up to a larger container as they grow. Look for at least three sets of leaves on the plant. Use a dull knife or spoon to carefully loosen the soil edges in the smaller container and move the entire root ball with soil to the next size container, usually from a 2-inch to a 3- or 4-inch size. Moist soil makes for easier potting up.

Now is the perfect time to gather friends together to exchange garden seeds for the upcoming outdoor garden season. Make it a real seed party by serving food and drinks. Then talk about gardening and the good times ahead.

Resources

Betty Cahill writes and speaks about gardening in the Rocky Mountain Region.


Wednesday, February 5, 2025

Grow Lights for Indoor Seeding!


An inexpensive LED clamp-on plant light, strip lighting or a compact free-standing light fixture might suffice for a small tray of seeds. (Betty Cahill, Special to The Denver Post)
Denver, CO - MARCH 15: Denver Post garden contributor Betty Cahill demonstrates how to properly divide and move plants for this week's DPTV gardening tutorial.  Plants are divided or moved because they are overgrown, overcrowded, lack vigor or are in the wrong place. Spring is the best time to move summer and fall blooming plants. (Photo by Lindsay Pierce/The Denver Post)
PUBLISHED:

Gardeners pass the winter months spending more time inside, giving our minds and hands projects that keep us thinking green thoughts. This is especially helpful when the dormant garden stares back at us all winter.

Activities like direct seeding new plants and vegetables indoors take center stage in mid to late winter. Gardeners know that starting plants by seed indoors is a money saver once all the equipment is purchased, and there are opportunities to try new and unusual plant varieties. For some gardeners, seed starting gets in your system and mindset. It is akin to an innate sense to nurture and care for life; after all, those little seeds can eventually grow into beautiful blooming and delicious edible plants.

A fixture with two or more flexible gooseneck arms can easily be moved around for the best placement over seeds and plants. (Betty Cahill, Special to The Denver Post)

A fixture with two or more flexible gooseneck arms can easily be moved around for the best placement over seeds and plants. (Betty Cahill, Special to The Denver Post)

One of the most important tools for successful indoor seeding is light, and lots of it. Supplementing a home with artificial lighting is the most efficient way to get seeds to germinate and get growing. The artificial light fixture choices today range from a few dollars to, well, the sky is the limit. From little clip-on LED fixtures to mammoth light panels that are used by wholesale growers, there is a light fixture out there for you.

As much as I wish growing on a sunny windowsill would work well enough without supplemental lighting, and in some situations it does, relying on these conditions may not be optimal for thriving seed emergence and growth. Natural light from a window can be hit or miss with the obvious hurdles for the seeds in getting enough light, possible cold exposure from the windows and experiencing cloudy days which further limits natural light.

Indoor seed lighting

If you had asked me several years ago what changes would eventually occur in the indoor seed starting arena, I would have said to look for more seed introductions for plants to have longer bloom times or more resistance to diseases. I only know this because plant breeders have been working in these areas for many decades.

No way would I have guessed how much indoor lighting options have expanded and contributed to more efficient energy savings and low heat output. Plus, there are numerous choices of low-cost light fixtures with unique features and styles that make indoor plant seeding worthwhile and an almost must for any level of gardener.

One of the takeaways for making any plant light purchase, or changes to what you are currently using for seed starting, is to set your budget and determine how many plants you wish to grow from seed. Do what you can afford and what makes sense for your space. An inexpensive LED clamp-on plant light, strip lighting or a compact free-standing light fixture might suffice for a small tray of seeds, or works well as additional light for a houseplant or two. A fixture with two or more flexible gooseneck arms can easily be moved around for the best placement over seeds and plants.

If you need more space for several trays for scores of different vegetables and annuals, then framed stands with light attachments or setups using bookcases, ceiling hooks or other systems are available. Using the decades-old traditional fluorescent shop light bulbs still work well, too.

If you need more space for several trays for scores of different vegetables and annuals, then framed stands with light attachments or setups using bookcases, ceiling hooks or other systems are available. (Betty Cahill, Special to The Denver Post)

LED lights on the market today offer plant benefits (growth, health and development) depending on the color they emit on the visible light spectrum, which includes variations of green, blue, yellow and red. Generally, plants use violet and blue light waves for more vegetative growth, while red lights are used for more reproductive growth plus flowering and fruiting. Many of the hobby gardener indoor LED plant lights on the market today offer integrated full spectrum lighting, meaning they provide both red and blue and other light colors simultaneously to promote all stages of plant growth.

Another advantage of using different LED light colors is that plants not directly below the light fixture still benefit and will be illuminated.
(Color science can be very technical. There are many credible websites out there that delve into more theory if you are so inclined.)

When looking for what LED light system works best for your situation, shop at a reputable independent garden center. Box stores and online companies have a large selection of indoor plant seeding lights and equipment, too. I like to see the light setup in person, since there are so many choices and price ranges.

Add another layer of convenience and consider purchasing LED lighting systems with smartphone apps or voice commands so that lights can be controlled for brightness and specific plant needs. Before we know it, AI will be growing seeds instead of us in our own homes (but hopefully not in my lifetime).

In a future column, I’ll cover the all-important steps and insider tips to successful seed starting.

Betty Cahill writes and speaks about gardening in the Rocky Mountain Region.