 |
| Garlic Selection at a Farmer's Market, Provence, France |
How much do you need?
I grow a lot of garlic for a home gardener. I mail order anywhere from 3 to 8 pounds of planting stock each year (I share). Plus I purchase additional planting bulbs from local garden centers (I like to support the home team). They have gotten the memo that home grown garlic is super easy to grow and people want variety. Plus it’s a no brainer for folks to buy garlic planting stock right along with their ornamental bulbs since they can be planted all fall until the ground freezes. Keep in mind that once you grow your own garlic, you can use some your harvest as planting stock the same fall season, how’s that for sustainability! Just be sure to save the largest, healthiest bulbs.
Mail order planting garlic can be purchased in quantities of one or two bulbs up to one half to one pound or more per variety. Garden centers sell in smaller quantities - one to three bulbs. Depending on variety, ordering one pound of garlic can be anywhere from 3 to 6 garlic bulbs. Each individual clove on the bulb is planted, which will grow into one full bulb when harvested next spring in late June or early July. Keep this easy math in mind when you order or purchase bulbs. If you only want a few plants, then you’ll only need a bulb or two.
You can also check local farmer’s markets for planting garlic stock. Keep in mind that mail order availability decreases in the fall, so next year order early in the summer or as soon as you get a catalog in the mail. They’ll ship when it’s time to plant anytime from September through October. Just get them in the ground before the ground freezes, just like ornamental bulbs.
What to Buy
It’s a must to use quality planting stock instead of buying grocery store garlic. You don’t know if the grocery store garlic was treated to prevent sprouting or how it was stored. You’ll notice that some sellers are offering virus-free or nematode free planting bulbs. Garlic can carry some of the onion related ails like fusarium and onion yellow dwarf virus. From my experience using quality planting stock (not listed as virus-fee) from a trusted mail order or local garden center will grow just fine.
 |
| Hardneck Garlic w/Scapes, June before Harvest |
Hardnecks have outstanding flavor, and highly recommended for making salad dressings and pressed fresh over vegetables. They are also delicious when baked or eaten raw for health benefits. Hardneck bulbs have fewer cloves (4-12 or so) and are easy to peel (much appreciated by gourmets including you once you try them). Hardnecks have a much shorter shelf life than softnecks, ranging from 3 to 6 months or so after harvest and curing. Use them first.
 |
| Softneck Garlic, Early May |
 |
| Indoor Garlic Chives |
Planting Basics
I plant in raised beds in a sunny location. In-ground beds work well too. Sun is important. You can plant cloves in part shade right now, just as long as after the winter solstice the area starts getting more sun, then full sun by the June or July harvest. Tuck them through the landscape if you have good soil, sun and no competition from other plant roots. Just remember where they are planted so you can water them through the winter if moisture is scarce.
Soil should be amended and have good drainage, never plant in wet soil. Garlic doesn’t grow well in compacted soil or heavy clay. Add a balanced fertilizer like a 10-10-10 a few weeks before planting. Garlic isn’t a super high nitrogen feeder, but it does need nitrogen. Too little nitrogen may produce yellow plants, less vigor and smaller bulbs.
Gather your materials prior to planting - bulbs, planting labels, trowel, box or tray to hold separated bulbs, and mulch. Remember that one bulb will grow from one clove so plan accordingly. And use the largest cloves to plant, they grow into large bulbs.
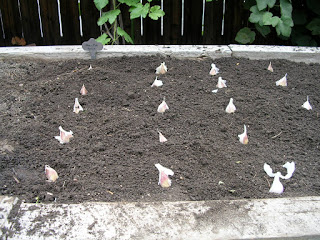
On planting day I carefully open the bulb and separate the cloves, no worry if the papery sheath falls off. I place the cloves (pointed side up) on top of the soil spaced 4 to 6 inches apart with the rows 8 to 12 inches apart. After placing, plant each clove 2-3 each inches deep. Often the soil is so workable that you can just push the clove down into the soil.
OR dig a 3-inch trench and place the cloves 4 to 6 inches apart, then cover with soil. Be sure to label each row. This is shown on the video.
After planting place a 2-3 inch layer of mulch over the bed and water it well. Through the winter I will renew the mulch and water once or twice a month if it’s been dry. If spring is very rainy I’ll remove the mulch so the growing bulbs won’t risk getting mold. Check back next year for more growing tips and harvest information.
 |
| Pointed side up cloves 4-6 inches apart |
 |
| Leaf mulch over newly planted garlic cloves |

No comments:
Post a Comment
Note: Only a member of this blog may post a comment.